
- はじめに
- 使用するホスト
- ホストの作成
- dockerのインストール
- dockerグループにubuntuユーザーを追加
- self-hosted runnersの設定
- ジョブを実行
- ランナーのサービス登録
- まとめ
はじめに
Organizationレベルでのself-hosted runnersの設定がアナウンスされました。
まだself-hosted runnersを検証してなかったので、この機会に動作検証を実施してみました。
使用するホスト
self-hosted runnersが対応しているOSは以下に記載があります。
今回はAWS環境でUbuntu 16.04をホストとして使用するので、ここからAMIを検索します。
ap-northeast-1 xenial 16.04 LTS amd64 hvm:ebs-ssd 20200407 ami-0196a6e6d6129f2c8 hvm
ホストの作成
terraformを使ってEC2を作成します。
検証なので、EC2の作成はモジュールを利用しています。
subnet_idの部分だけ環境に合わせてもらえればそのまま実行できると思います。
# EC2
module "gh-actions-self-hosted" {
  source  = "terraform-aws-modules/ec2-instance/aws"
  version = "~> 2.0"

  name           = "gh-actions-self-hosted"
  instance_count = 1

  ami           = "ami-0196a6e6d6129f2c8" #ubuntu 16.04 LTS
  instance_type = "t2.micro"
  subnet_id            = aws_subnet.private_a.id
  iam_instance_profile = aws_iam_instance_profile.gh-actions-self-hosted.name

  tags = {
    Terraform   = "true"
    Environment = "dev"
    Service     = "github-actions"
  }
}

# IAM
resource "aws_iam_instance_profile" "gh-actions-self-hosted" {
  name = "gh-actions-self-hosted"
  role = aws_iam_role.gh-actions-self-hosted.name
}

resource "aws_iam_role" "gh-actions-self-hosted" {
  name               = "gh-actions-self-hosted"
  path               = "/"
  assume_role_policy = <<EOF
{
  "Version": "2012-10-17",
  "Statement": [
    {
      "Action": "sts:AssumeRole",
      "Principal": {
        "Service": "ec2.amazonaws.com"
      },
      "Effect": "Allow",
      "Sid": ""
    }
  ]
}
EOF
}

# for ssm
# sshではなくセッションマネージャー経由でログインする為
resource "aws_iam_role_policy_attachment" "gh-actions-self-hosted-ssm" {
  role       = aws_iam_role.gh-actions-self-hosted.name
  policy_arn = "arn:aws:iam::aws:policy/AmazonSSMManagedInstanceCore"
}
セキュリティグループは何も設定していない為defaultが設定されます。
GitHubとホスト(ランナー)との通信は、ホストからの一方通行なので、アウトバウンドが全て許可されていれば動作します。
dockerのインストール
セッションマネージャーにてEC2へ接続し、dockerをインストールします。
Install Docker Engine on Ubuntu | Docker Documentation
$ sudo su - ubuntu
$ sudo apt-get update
$ sudo apt-get install -y \
    apt-transport-https \
    ca-certificates \
    curl \
    gnupg-agent \
    software-properties-common
$ curl -fsSL https://download.docker.com/linux/ubuntu/gpg | sudo apt-key add -
$ sudo add-apt-repository \
   "deb [arch=amd64] https://download.docker.com/linux/ubuntu \
   $(lsb_release -cs) \
   stable"
$ sudo apt-get update
$ sudo apt-get install -y docker-ce docker-ce-cli containerd.io
$ sudo docker -v
dockerグループにubuntuユーザーを追加
この後self-hosted runnersの設定及び起動はrootユーザーでは実行できない為、実行するubuntuユーザーにもdockerを起動できるようにします。
$ sudo usermod -aG docker ubuntu
$ docker info
Client:
 Debug Mode: false

Server:
ERROR: Got permission denied while trying to connect to the Docker daemon socket at unix:///var/run/docker.sock: Get http://%2Fvar%2Frun%2Fdocker.sock/v1.40/info: dial unix /var/run/docker.sock: connect: permission denied
errors pretty printing info

### そのままだと設定が反映されてないので再ログイン
$ exit
$ sudo su - ubuntu
$ docker info
self-hosted runnersの設定
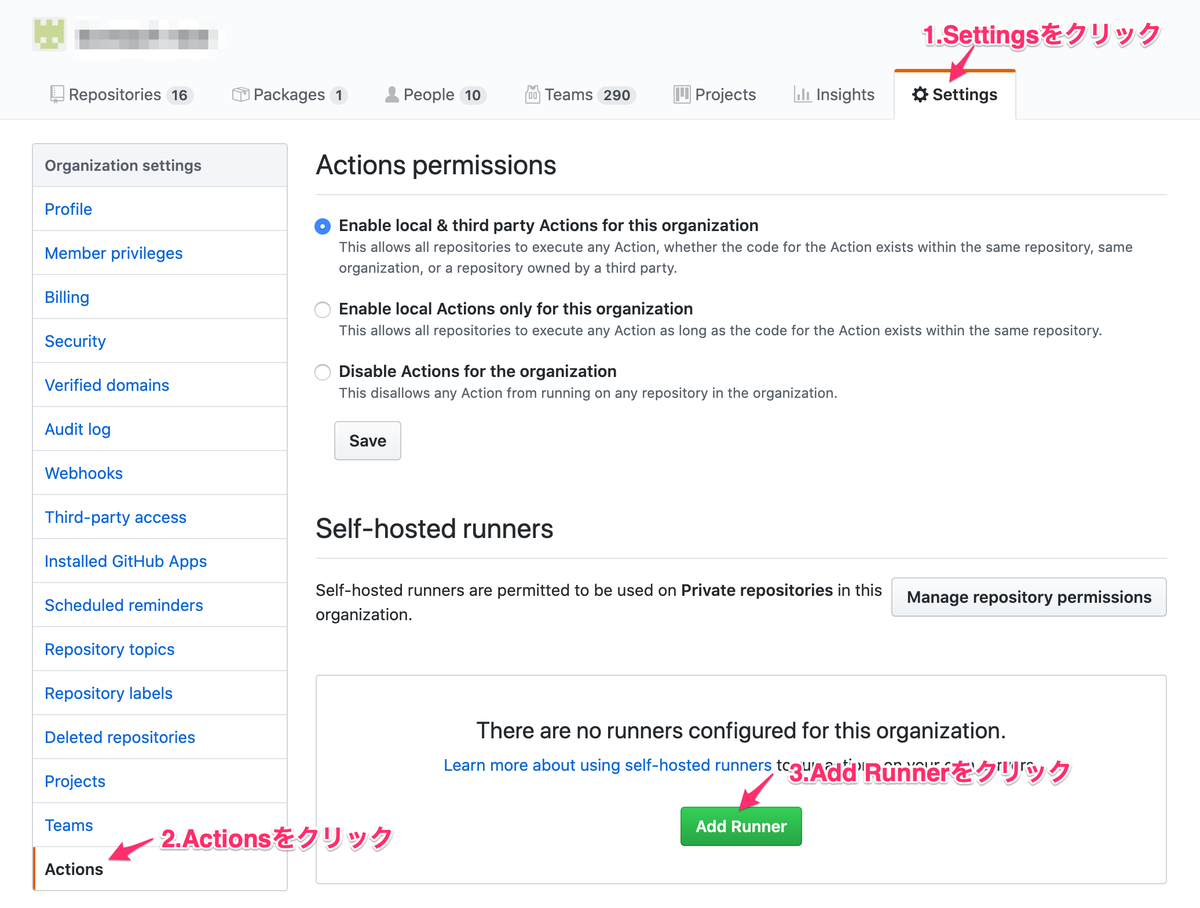
OrgnizationのActions設定画面からRunner追加をクリックします。
Runner上で実行するコマンドが表示されます。
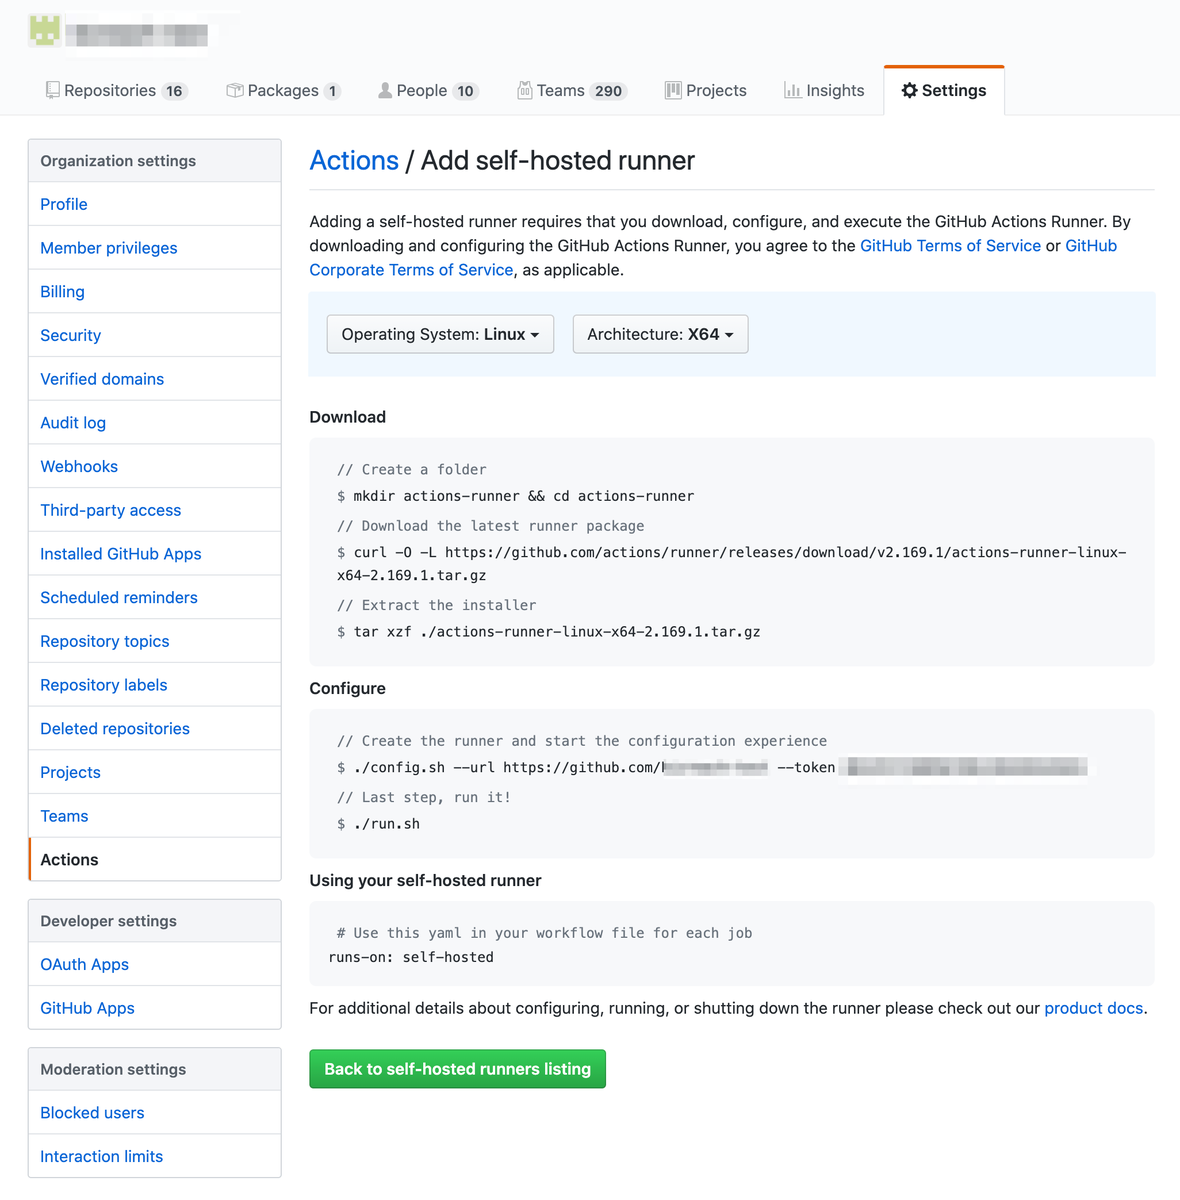
$ mkdir actions-runner && cd actions-runner
$ curl -O -L https://github.com/actions/runner/releases/download/v2.169.1/actions-runner-linux-x64-2.169.1.tar.gz
$ tar xzf ./actions-runner-linux-x64-2.169.1.tar.gz
$$ ./config.sh --url https://github.com/********* --token *******************************

--------------------------------------------------------------------------------
|        ____ _ _   _   _       _          _        _   _                      |
|       / ___(_) |_| | | |_   _| |__      / \   ___| |_(_) ___  _ __  ___      |
|      | |  _| | __| |_| | | | | '_ \    / _ \ / __| __| |/ _ \| '_ \/ __|     |
|      | |_| | | |_|  _  | |_| | |_) |  / ___ \ (__| |_| | (_) | | | \__ \     |
|       \____|_|\__|_| |_|\__,_|_.__/  /_/   \_\___|\__|_|\___/|_| |_|___/     |
|                                                                              |
|                       Self-hosted runner registration                        |
|                                                                              |
--------------------------------------------------------------------------------

# Authentication


√ Connected to GitHub

# Runner Registration

Enter the name of runner: [press Enter for ip-**********] ubuntu

This runner will have the following labels: 'self-hosted', 'Linux', 'X64'
Enter any additional labels (ex. label-1,label-2): [press Enter to skip]

√ Runner successfully added
√ Runner connection is good

# Runner settings

Enter name of work folder: [press Enter for _work]

√ Settings Saved.
上記でセットアップが完了するので起動します。
$  ./run.sh

√ Connected to GitHub

2020-04-23 05:28:43Z: Listening for Jobs
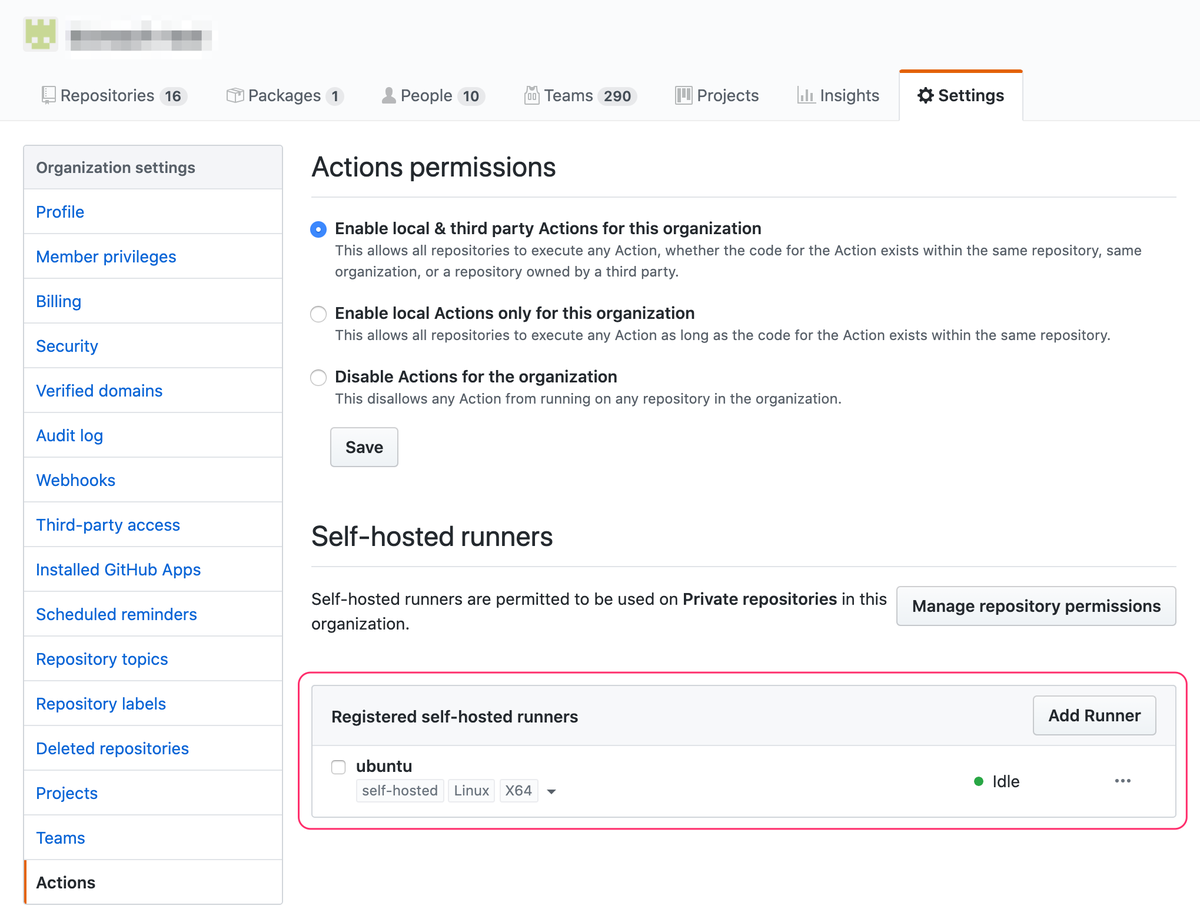
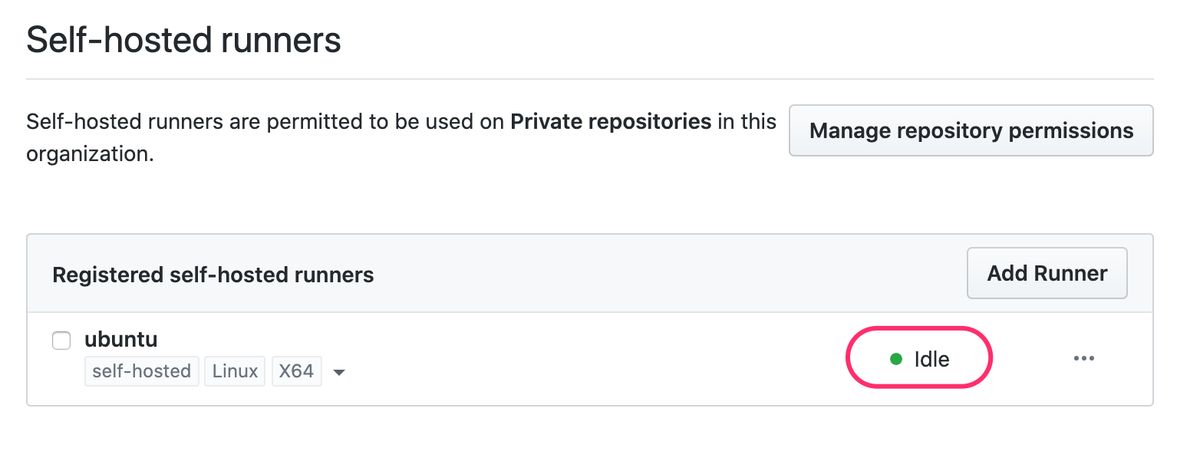
Actions設定画面に戻るとホストが追加されます。
ジョブを実行
ホストの設定が完了したので実際にジョブを実行してみたいと思います。
既に動かしているterraformのworkflowにて、runs-on:をubuntu-latestからself-hostedに変えて実行します。
jobs:
  terraform:
    name: 'Terraform plan'
    runs-on: self-hosted
GitHub ActionsでのTerraformの実行は以前のこちらの記事を参照ください。
ホスト上のコンソールにログが出力され、画面からもジョブの実行を確認できました。
$ ./run.sh

√ Connected to GitHub

2020-04-23 06:27:06Z: Listening for Jobs
2020-04-23 06:35:26Z: Running job: Terraform plan
2020-04-23 06:36:23Z: Job Terraform plan completed with result: Succeeded

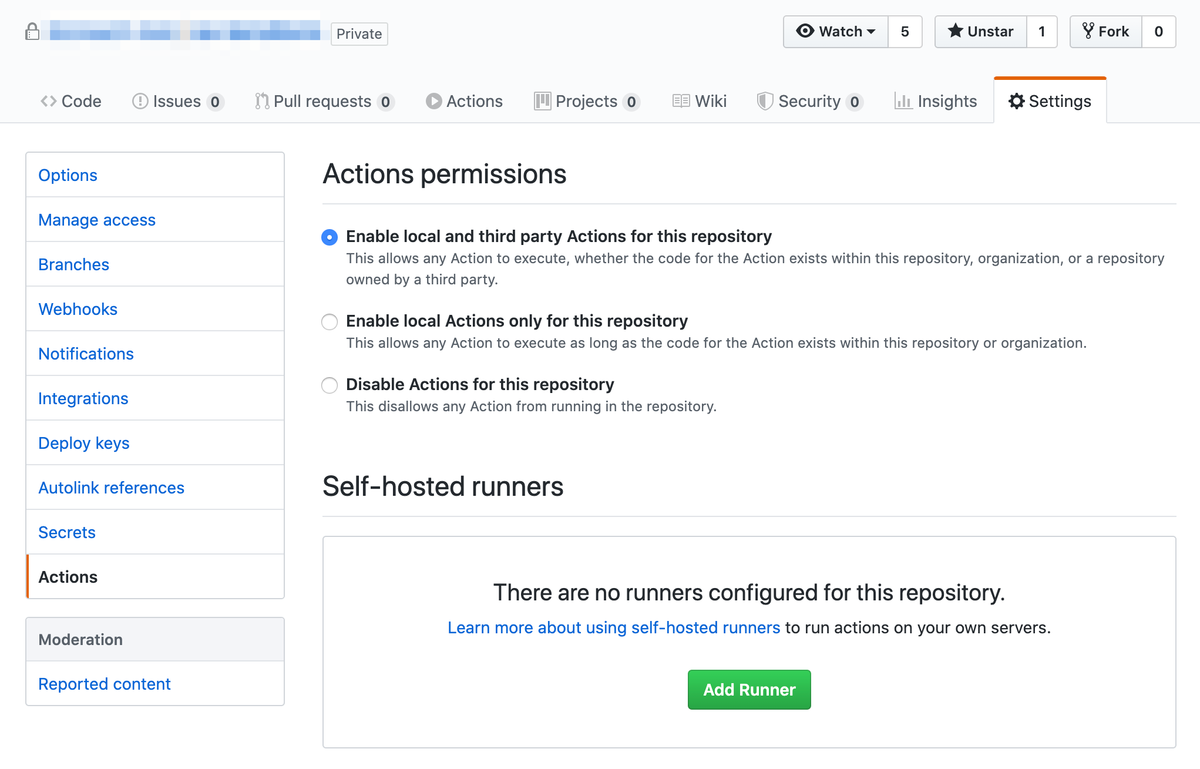
ちなみにリポジトリ側のActionsの設定にはホストは何も表示されていません。
ランナーのサービス登録
このままだとコンソールを閉じると実行できなくなるので、サービス化を行います。
Configuring the self-hosted runner application as a service - GitHub Help
$ sudo ./svc.sh install
$ sudo ./svc.sh start
これでコンソールを閉じてもサービスが起動している事が確認できます。
まとめ
今回は初めて設定してみましたが、かなり簡単に利用できました。
設定自体はリポジトリでの設定と変わりませんでした。
個々のリポジトリでの設定が不要になったので、同じ設定のホストを使う場合は作成がかなり楽になりますね。
今回は一台でしたが、複数のホストを作成する場合はラベルを利用するとこで、利用するホストを変更することができます。
Using labels with self-hosted runners - GitHub Help
GitHub Actionsは無料枠を超えると(追加費用を払わないと)利用できなくなるので、本番運用で複数のチームが利用している場合は、他チームの利用状況に影響を受けないようself-hosted runnersが安心かもしれませんね。
設定方法やGitHub Actions自体の動作については、以下を参考にさせていただきました!